Installing Asterisk NOW and Configuring Soft Phones - Setup a simple VOIP system at home or office
2.Using AsteriskGUI™
The AsteriskGUI gives you the ability to configure and manage your Asterisk implementation. You can set up your Asterisk implementation through the GUI, or through the command line. Any Asterisk options that are not displayed in the GUI can be edited through either the command line or through a special GUI command interface. This section discusses how to log on to the AsteriskGUI, as well as an overview of the standard GUI delivered with Asterik Business Edition. GUI Log On In the address field of a browser (Firefox is recommended), enter the URL assigned to your Asterisk server. The initial GUI log on page is displayed.
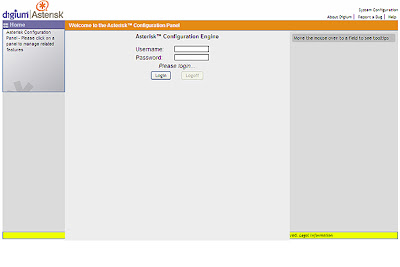
The default user name is "admin" and password is "password",you can find these settings in manager.conf
In centOS terminal type" nano /etc/asterisk/manager.conf " manager.conf page is open then find out or write
[admin]
secret = yourpassword
read = system.call,log,verbose,agent,config
write = system.call,command,agent,config,orginate
In this admin is username and yourpassword is password.
AsteriskGUI™ Section Descriptions
User Extensions (2. Creating User Accounts)
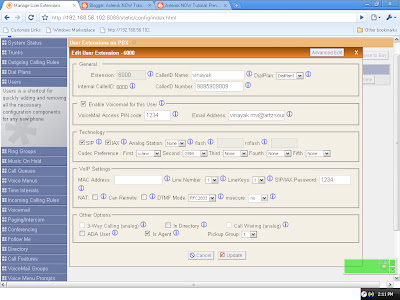
The following information comprises a user extension definition:
• Extension - The extension assigned to the defined user.
• Name - The first and last name of the individual assigned to this extension. The name can also be that of a department,such as Sales or Support, for example. This is important because the Dial By Name Directory function of Asterisk uses this information to route calls.
• Password - The password for the user's sip/iax account.
• VM Password - The password used to access voicemail for the specified extension.
• E-mail Address - Voice mails received by this extension can be sent as audio file attachments e-mailed to a specific address.
• Caller ID - Identifies the Caller ID presented when the listed extension dials out.
• Analog Phone - A drop-down menu is available to identify the analog phone port which this extension will access.If more than one phone is connected to your Asterisk system you will need to confirm the port number listed on your hardware card.
• Dial Plan - This option references the Calling Rules option on the left tool bar. Based on the calling rules you’ve created, you can restrict the outbound dialing of this extension to local calls, emergency calls, and standard longdistance calls for North America. This option also allows blocking or allowing international (011 prefix dialed) calls.
• Phone Serial - This field is used to enter the serial number of a Polycom phone to enable phone provisioning. Once enabled the phone will be provisioned. There are also several advanced extension options available.The advanced options establish the connections from the listed extension to other systems within the Asterisk server. These systems include the following:
• Voicemail - Builds a voice mail box for the extension that can be reached by dialing the Check Voicemail extension.The Voicemail extension can be configured. The current default is 6050.
• In Directory - Asterisk establishes a directory of all extensions so that inbound callers can reach someone in your office by dialing the first few digits of the person’s first or last name. The company directory includes only the name of the extension if this option is checked.
• E-mail Only - Select this option to send voicemail messages to the specified e-mail address without storing the message in the mailbox.
• SIP - Identifies whether the extension sends and receives calls using the VoIP protocol SIP.
• IAX - Identifies whether the extension sends and receives calls using the VoIP protocol IAX.
• CTI - Selecting this option (Computer Telephony Integration) allows the user to connect applications to the Asterisk Management Interface.
• Is Agent- Call queuing is made up of a bank of agents who receive calls. An extension listed as Is Agent can be added to queues from the CallQueues option on the left toolbar.
• Call Waiting - If call waiting is not enabled, the extension accepts only one call before it is identified as busy.
• 3-Way Calling - Allows the extension to receive a call and then dial out to another phone number to conference with the inbound call and the recipient of the outbound call.
• Can Reinvite - This option can be used to tell the Asterisk server whether or not to issue a reinvite to the client.
• NAT - Try this setting when Asterisk is on a public IP, communicating with devices behind a NAT device (broadband router). If you have one-way audio problems, you usually have problems with your NAT configuration or your firewall's configuraiton of SIP and RTP ports.
1. Installing Asterisk NOW
2. Creating User Accounts
3. Setting up sip softphone (using x-lite) registering user with the server
1. Installing Asterisk NOW
Download AsteriskNOW iso from asterisk home page and install
2.Using AsteriskGUI™
This is local address for asterisk gui,im running asterisk on oracle virtual box
http://ip address of your Asterisk server:port/static/config/index.html
my address is http://192.168.56.102:8088/static/config/index.html

The default user name is "admin" and password is "password",you can find these settings in manager.conf
In centOS terminal type" nano /etc/asterisk/manager.conf " manager.conf page is open then find out or write
[admin]
secret = yourpassword
read = system.call,log,verbose,agent,config
write = system.call,command,agent,config,orginate
In this admin is username and yourpassword is password.
AsteriskGUI™ Section Descriptions
User Extensions (2. Creating User Accounts)

The following information comprises a user extension definition:
• Extension - The extension assigned to the defined user.
• Name - The first and last name of the individual assigned to this extension. The name can also be that of a department,such as Sales or Support, for example. This is important because the Dial By Name Directory function of Asterisk uses this information to route calls.
• Password - The password for the user's sip/iax account.
• VM Password - The password used to access voicemail for the specified extension.
• E-mail Address - Voice mails received by this extension can be sent as audio file attachments e-mailed to a specific address.
• Caller ID - Identifies the Caller ID presented when the listed extension dials out.
• Analog Phone - A drop-down menu is available to identify the analog phone port which this extension will access.If more than one phone is connected to your Asterisk system you will need to confirm the port number listed on your hardware card.
• Dial Plan - This option references the Calling Rules option on the left tool bar. Based on the calling rules you’ve created, you can restrict the outbound dialing of this extension to local calls, emergency calls, and standard longdistance calls for North America. This option also allows blocking or allowing international (011 prefix dialed) calls.
• Phone Serial - This field is used to enter the serial number of a Polycom phone to enable phone provisioning. Once enabled the phone will be provisioned. There are also several advanced extension options available.The advanced options establish the connections from the listed extension to other systems within the Asterisk server. These systems include the following:
• Voicemail - Builds a voice mail box for the extension that can be reached by dialing the Check Voicemail extension.The Voicemail extension can be configured. The current default is 6050.
• In Directory - Asterisk establishes a directory of all extensions so that inbound callers can reach someone in your office by dialing the first few digits of the person’s first or last name. The company directory includes only the name of the extension if this option is checked.
• E-mail Only - Select this option to send voicemail messages to the specified e-mail address without storing the message in the mailbox.
• SIP - Identifies whether the extension sends and receives calls using the VoIP protocol SIP.
• IAX - Identifies whether the extension sends and receives calls using the VoIP protocol IAX.
• CTI - Selecting this option (Computer Telephony Integration) allows the user to connect applications to the Asterisk Management Interface.
• Is Agent- Call queuing is made up of a bank of agents who receive calls. An extension listed as Is Agent can be added to queues from the CallQueues option on the left toolbar.
• Call Waiting - If call waiting is not enabled, the extension accepts only one call before it is identified as busy.
• 3-Way Calling - Allows the extension to receive a call and then dial out to another phone number to conference with the inbound call and the recipient of the outbound call.
• Can Reinvite - This option can be used to tell the Asterisk server whether or not to issue a reinvite to the client.
• NAT - Try this setting when Asterisk is on a public IP, communicating with devices behind a NAT device (broadband router). If you have one-way audio problems, you usually have problems with your NAT configuration or your firewall's configuraiton of SIP and RTP ports.
• DTMF Mode - Set the default DTMF mode for sending DTMF (touch tone). The default setting is rfc2833. Other options include:
• info - Used to display SIP Info messages
• inband - Inband audio (requires 64 kbit codec - alaw, ulaw)
• auto - Use rfc2833 if offered, inband otherwise.
• Insecure - Insecure is a SIP parameter used to determine peer matching. The following options are valid: Enter Port for a peer without matching port, do not require authentication of invites. Options are: * Port * Invite
* port,invite
• Port - Enter this value to match against only an IP address. This setting is useful if you have multiple endpoints behind a NAT device.
• Invite - Enter this value to match against both the IP address and port number provided in the Contact field of the SIP header. A call will be allowed without authentication if a match is found.
• Invite, Port - Specify this value if you do not want to require authentication upon an initial invite.
To add new extensions, select New Entry in the area under Extensions and then click New. The system defaults to four-digit extensions, beginning with the number 6000. Click Edit Codecs to select one or more codes for the currently selected user extension.
3. Setting up sip softphone (using x-lite) registering user with the server
Setting up Sip Softphone
Nows it time to setup your sip softphone (not a real hardware phone same settings apply) with the registered user details setup previously.
For this task I used a popular sip softphone (x-lite FREE) available athttp://www.counterpath.com/
Now with an asterisk user ready to be used, install and then open up x-lite
In X-lite
- Right click on the x-lite screen and click settings
- Now enter the Display name
- Username & Authorization name
- and point the Domain and proxy to the address of your server in this case 192.168.56.102
Apply the changes